The owner approached me after seeing my blog.
He wanted a PC in his car not only to enjoy the functionality, but also to monitor his car through OBD.
Computer Specification:
AMD E-350 Zacate
4GB Ram
Lilliput LED screen.
During installation...
Mounting the pc below the driver's seat.
[RESERVED SPACE] - Pics of screen and finished product.
Carpc? What's that? Put a PC in a car? For what? This blog aims to provide information for people who wants to embark on the hobby. At the same time we shall share people's experiences and their carpc systems.
Showing posts with label installations. Show all posts
Wednesday, April 24, 2013
Past project : Toyota Fielder
Past projects
2010 - Toyota Fielder (Axio Station Wagon)
The car pc - ASUS mini-itx carpc mounted underneath the carseat.
Tight and clean underneath the car seat. with easy access to the various ports.
Mounting the screen in progress
First screen with some gaps on the dashboard.
Owner did not like the first screen and upgraded to a Lilliput screen mounted seamlessly.
2010 - Toyota Fielder (Axio Station Wagon)
The car pc - ASUS mini-itx carpc mounted underneath the carseat.
Tight and clean underneath the car seat. with easy access to the various ports.
Mounting the screen in progress
First screen with some gaps on the dashboard.
Owner did not like the first screen and upgraded to a Lilliput screen mounted seamlessly.
Monday, August 2, 2010
Honda City CarPC
Over the last weekend, I upgraded the carpc of a Honda City 2007. The owner used to have a laptop running and the laptop was giving him some problems recently most probably attributed to heat issues.
Here are the details of the install.
For the power supply, we are using the ITPS (GP83) bought from store.mp3car.com. It costs us USD69.95 excluding shipping previously. (I shipped in this item together with a few other stuff, so not sure of the shipping of a single item)

The ITPS power supply fits nicely to the casing.
For those who want more information of the ITPS, here's the link to the pdf. GP83 ITPS
It's a good thing that the mini-itx casing we got can utilise a 3.5 inch HDD as the owner wanted to save some $$ and use his unwanted stuff from a old PC. Note that 3.5 inch HDD are not the best to use in a car environment. Not only do they draw more power, they generate more heat while running.

The back of the casing, showing where the wires will be coming out from. The big hole will be blocked with a piece of acrylic during the install.

Another picture showing the packed compartment of the carpc, and the location of the ITPS power supply

This picture shows the difference of my M300 mini-itx vs this casing.

This casing is available from MiniSQ in Novena Square for SGD75. Do note this price was without the original power supply that came with the casing as i had no use for it.
During the install.
Take a look at his screen. Due to the limited width of the city's console, the VGA screen had to be disassembled from its casing. A piece of plastic was cut to fill up any existing holes. The result, although not perfect, had a rather OEM look, with no buttons.

This is all the space the carpc took up in the boot. City's seat had absolutely no space and thus, installing underseat was not a option.

Unfortunately, our camera went out of battery and did not managed to take more pictures of the install. I wanted to show more of the wiring.
For now, just try to visualise until i manage to get the picture.
For the ITPS to work, we only need 3 wires. 12V, Ignition and Ground. The output of the ITPS will have a remote (to turn on amps). For this install, I use the ITPS to supply power to the VGA screen as well. Using the ITPS's regulated 12V power supply will prevent "waves" caused by the car's unregulated power supply. VGA screens draw no more than 2A, so it's still very little power for the power supply to cope
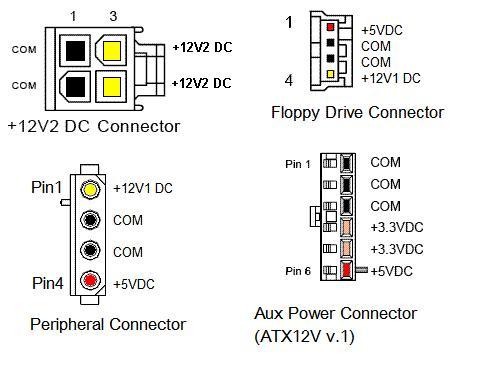
We use the yellow and black wire from the 4-pin connector.
A final shot of the city with the PC installed.

The owner is certainly enjoying his new entertainment center!
Here are the details of the install.
For the power supply, we are using the ITPS (GP83) bought from store.mp3car.com. It costs us USD69.95 excluding shipping previously. (I shipped in this item together with a few other stuff, so not sure of the shipping of a single item)
The ITPS power supply fits nicely to the casing.
For those who want more information of the ITPS, here's the link to the pdf. GP83 ITPS
It's a good thing that the mini-itx casing we got can utilise a 3.5 inch HDD as the owner wanted to save some $$ and use his unwanted stuff from a old PC. Note that 3.5 inch HDD are not the best to use in a car environment. Not only do they draw more power, they generate more heat while running.
The back of the casing, showing where the wires will be coming out from. The big hole will be blocked with a piece of acrylic during the install.
Another picture showing the packed compartment of the carpc, and the location of the ITPS power supply
This picture shows the difference of my M300 mini-itx vs this casing.
This casing is available from MiniSQ in Novena Square for SGD75. Do note this price was without the original power supply that came with the casing as i had no use for it.
During the install.
Take a look at his screen. Due to the limited width of the city's console, the VGA screen had to be disassembled from its casing. A piece of plastic was cut to fill up any existing holes. The result, although not perfect, had a rather OEM look, with no buttons.
This is all the space the carpc took up in the boot. City's seat had absolutely no space and thus, installing underseat was not a option.
Unfortunately, our camera went out of battery and did not managed to take more pictures of the install. I wanted to show more of the wiring.
For now, just try to visualise until i manage to get the picture.
For the ITPS to work, we only need 3 wires. 12V, Ignition and Ground. The output of the ITPS will have a remote (to turn on amps). For this install, I use the ITPS to supply power to the VGA screen as well. Using the ITPS's regulated 12V power supply will prevent "waves" caused by the car's unregulated power supply. VGA screens draw no more than 2A, so it's still very little power for the power supply to cope
We use the yellow and black wire from the 4-pin connector.
A final shot of the city with the PC installed.
The owner is certainly enjoying his new entertainment center!
Wednesday, July 28, 2010
Intel Atom in my Hyundai Avante
I have a carpc in my hyundai avante for about 3 years now.
Recently I have upgraded to a ATOM chipset (from the old VIA mini-itx board)
Showing some pics I took during the install.
Testrunning the setup at home desk
The carpc with its mini-itx ATOM board
Fitting the VGA touchscreen
Fitment to the console
Mess of wires
PC mounted below driver seat
Amp mounted below passenger seat
First mounted and boot to Windows
My frontend
A full screen mtv
Integrated Garmin
Other items connected to the car pc
- starhub 3G mobile broadband via a USB-stick
- OBDII reader (Avante uses CAN-bus)
- USB dvb-t, dab and FM radio stick
- Bluetooth handsfree
Some people might ask... why put a PC in the car?
- Huge storage space. That's a lot of songs and videos.
- Big screen GPS
- Price.. it costs much less than the SONYs or Alpine double dins, yet performs as good. (Total setup is less than SGD 1k)
- Way better but costs not much more than the china-made 2 dins.
- I'm geeky and loved the curious look from frens exclaiming ... "You have a Windows in your car!!"
Subscribe to:
Posts (Atom)